 English
Content
- 1 1. What are outdoor path lights?
- 2 2. Waterproof Path Light Selection and Installation Guide
- 3 3. Maintenance Guide for Outdoor Waterproof Path Lights
- 4 4. Common Problems and Solutions for Outdoor Path Lights
- 5 5. Advantages and features of outdoor path lights
- 6 6. 10 Practical Tips to Extend the Life of Your Outdoor Path Lights
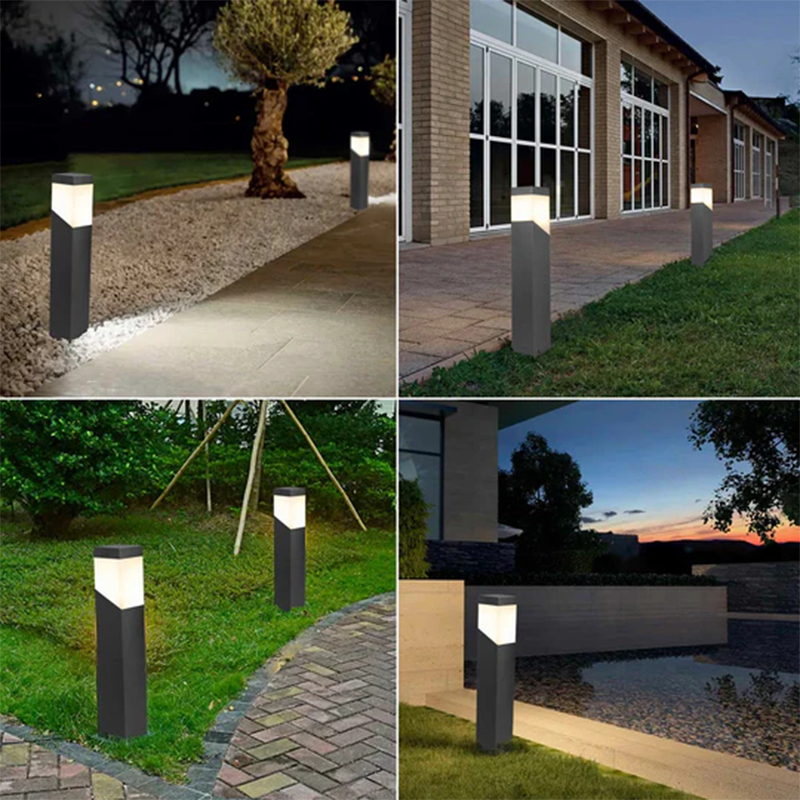
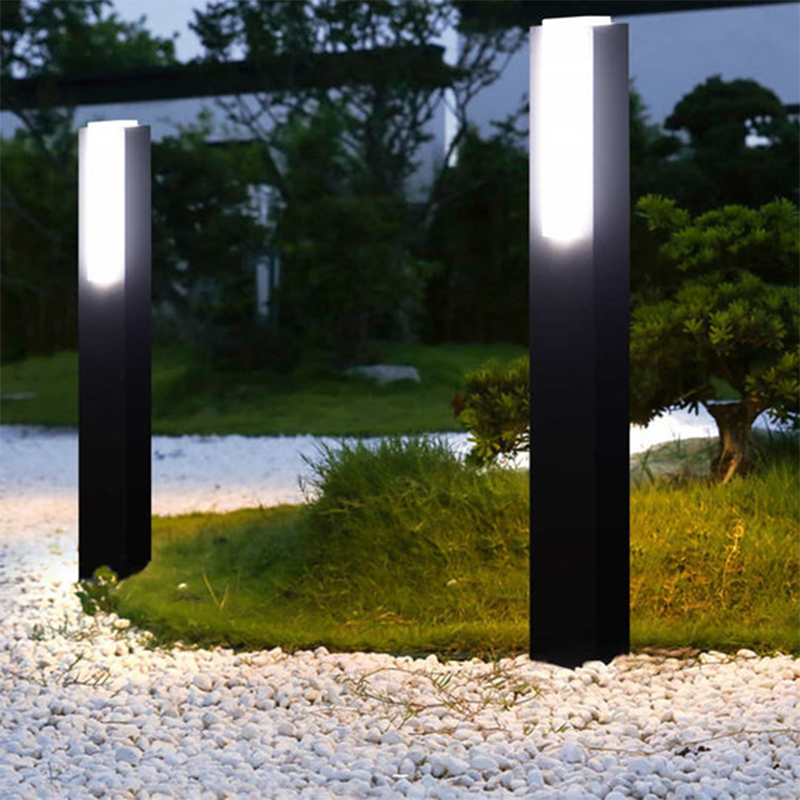
1. What are outdoor path lights?
Waterproof outdoor path lights are lighting fixtures designed specifically for outdoor environments, primarily used for nighttime illumination and safety guidance in areas such as garden paths, driveways, and walkways. These lights feature a special waterproof construction that withstands the harsh effects of rain, moisture, dust, and other outdoor elements, ensuring reliable operation in all weather conditions. The housing is typically made of corrosion-resistant stainless steel, aluminum alloy, or high-strength engineering plastic, with a special surface treatment for UV and rust resistance. The light source generally utilizes energy-efficient LED technology, offering ample brightness, excellent color rendering, and a lifespan of tens of thousands of hours. Power options include traditional mains-powered models and environmentally friendly, convenient solar-powered options, which automatically turn on and off via a built-in photosensor, eliminating the need for manual operation. Modern waterproof outdoor path lights also incorporate intelligent features. Some models feature motion sensors that automatically increase brightness upon detecting pedestrians, enhancing safety and saving energy. These lights can be installed in a variety of ways, including in-ground, recessed, and wall-mounted, allowing users to flexibly choose based on site conditions and decorative preferences. High-quality outdoor waterproof path lights not only provide essential functional lighting but also add a unique aesthetic to any outdoor space through their carefully designed design and lighting effects, perfectly blending practicality and decorative beauty.
These outdoor path lights feature a high-protection rating (IP65 or higher) and weather-resistant materials, making them impervious to wind and rain. Equipped with a high-efficiency LED light source, they consume less energy than traditional lamps, saving energy over time. The lights are hard-wired. The included accessories allow for installation on hard surfaces. For installation on soft surfaces, ground spikes are required. These path lights can be used to illuminate pathways, courtyards, gardens, terraces, sidewalks, stairways, and shrubbery. These outdoor lights are weatherproof and constructed from high-quality aluminum, making them rust-resistant and corrosion-resistant. They operate reliably even in storms, sleet, heavy snow, and extremely high or low temperatures.
Applicable scenarios:
Garden paths: Low-profile bollard or recessed lights provide soft, guiding light.
Garden walkways: Anti-glare design reduces glare and ensures pedestrian safety.
Driveways/stairs: High-intensity lighting prevents tripping and vehicle misjudgment at night.
Landscape decoration: Enhance the beauty of your garden through lighting patterns.
2. Waterproof Path Light Selection and Installation Guide
The selection and installation of outdoor waterproof path lights is a systematic discipline integrating optical engineering, materials science, and electrical technology. As a core component of an outdoor lighting system, these fixtures must balance functional lighting with aesthetically pleasing landscapes while also withstanding the rigors of harsh weather conditions. When selecting a fixture, it's crucial to understand its optical performance parameters, including key indicators like lumen output, beam angle, and color temperature. Lumen requirements can be calculated by multiplying the path width by 2.5 and then applying a safety factor of 1.3. For example, a 1.5-meter-wide path would require a fixture with an output of approximately 500 lumens. The color temperature should be considered based on the surrounding style. A warm 3000K light is suitable for natural landscapes, while a pure white 5000K light is more suitable for modern gardens. Aviation-grade 6063 aluminum alloy, after T6 heat treatment, boasts a tensile strength of 310 MPa. The ceramic coating, formed using a micro-arc oxidation process, can withstand a 3000-hour salt spray test. 5mm tempered glass is recommended for the light shield, offering a light transmittance of 92% and excellent impact resistance. Power supply system design is another key issue. Solar systems require energy storage based on average daily power consumption. For example, a 10W lamp operating for 8 hours per day requires a 12V/8Ah lithium battery pack. When wiring low-voltage DC wiring, ensure that voltage drop is kept within 5%, as this is crucial for lighting stability. Strict adherence to engineering specifications is essential during the installation and construction phase. Embedded components should be calibrated using a laser level, with leveling errors controlled within 2mm/m. In permafrost areas, the foundation depth should exceed 30cm below the local permafrost layer, and a gravel drainage layer should be provided.
Photovoltaic system commissioning should be conducted during noon, with open-circuit voltage and operating current tested to ensure compliance with standards. Lighting optimization can be achieved using a nine-point measurement method to ensure ground illumination uniformity greater than 0.4. A three-tiered system should be implemented for routine maintenance, including monthly inspections of seals, preventative maintenance such as replacing thermal paste every three years, and a major overhaul cycle of 5-7 years for LED module replacement. Technological advancements, including the use of new materials such as quantum dot phosphors and graphene heat sinks, will further enhance product performance. During implementation, it's recommended to use professional lighting design software for simulation and obtain a test report from an authoritative certification body to ensure the entire lighting system will maintain reliable operation for the next decade or even longer. Through such a systematic selection and installation plan, outdoor waterproof path lights can not only meet basic lighting needs, but also become an important landscape element that enhances environmental quality.
Choosing the right outdoor waterproof path light requires comprehensive consideration of multiple factors to ensure it meets functional needs while blending seamlessly with the surrounding environment. First, it's crucial to clearly define the lighting's intended use and primary purpose, whether it's functional lighting or decorative. This will directly influence the selection of parameters like brightness and color temperature. For areas where safety is crucial, such as walkways and steps, it's recommended to choose a model with higher brightness and more evenly distributed light. A natural white light temperature of 4000-5000K is preferred, providing clear, bright illumination. For leisure areas like gardens and courtyards, a warm white light of 2700-3000K can be used to create a warm and comfortable atmosphere. The lighting's protection rating is crucial. True waterproofing isn't simply a seal; it requires a multi-level protection system. High-quality products typically utilize die-cast aluminum, precision-machined to ensure surface tolerances of less than 0.1mm, and high-performance silicone seals to achieve IP65 protection and above, ensuring reliable operation in harsh weather, including heavy rain. Regarding material selection, aircraft-grade aluminum alloy is recommended for the lamp body, which undergoes a special surface treatment for excellent corrosion resistance. Tempered glass is optimal for the light shield, offering high light transmittance, excellent impact resistance, and resistance to yellowing and discoloration over time. The power supply method should be determined based on the installation environment. Solar-powered models are suitable for areas without power, but the photovoltaic panel conversion efficiency and battery capacity should be considered to ensure continued operation even during continuous rainy days. For mains-powered models, voltage stability and wiring specifications should be considered. Intelligent control features, such as light-activated automatic on/off and motion detection, can significantly enhance the user experience, providing both convenience and energy efficiency. Installation options are also important; consider site conditions and choose between floor-mounted, wall-mounted, or recessed installations. Finally, it's recommended to choose products from reputable brands. While they may be slightly more expensive, they offer greater assurance of quality and customer service, making them more economical in the long run. Only by considering these comprehensive considerations can you choose a waterproof path light that is both aesthetically pleasing and practical, adding safety and charm to your outdoor space.
Waterproof street light selection and installation guide table:
|
Category |
Selection Key Points |
Installation Specifications |
|
Applications |
• Walkways/Courtyards: 100-300 lumens • Driveways/Plazas: 500-1500 lumens • Decorative Lighting: 50-200 lumens |
• Determine the installation height based on the application (1-3m for walkways, 4-8m for driveways). • Avoid direct light exposure to the eyes; use a light-cutting design |
|
Protection Rating |
• Basic Waterproofing: IP65 (rain and dustproof) • High Protection: IP67/IP68 (withstands short-term immersion, suitable for heavy rain/coastal areas) |
• Check the integrity of the sealing ring. • Use waterproof tape and insulating sleeves at the wiring points |
|
Materials |
• Lamp body: Die-cast aluminum/stainless steel (corrosion-resistant) • Light shield: Tempered glass (impact-resistant) or UV-resistant PC |
• Choose 316 stainless steel for coastal areas • Avoid plastic lamp bodies in high-temperature areas (prone to aging) |
|
Light source |
• LED color temperature: Warm light (2700K-3000K) creates ambiance, white light (5000K-6500K) enhances safety |
• Test the light spot uniformity before installation • Avoid interference with ambient light (such as sodium lamps) |
|
Power supply |
• Solar power: No wiring required, requires matching battery capacity (e.g., 20Ah can support 3 days of cloudy and rainy weather) • Mains power: Stable but requires buried conduit wiring |
• Solar panels should face south (in the northern hemisphere), with an inclination angle approximately equal to the local latitude • Mains power line depth ≥ 50cm, with leakage protection installed |
|
Smart features |
• Motion detection (energy saving) • Light-controlled automatic on/off • App-based dimming/timing (high-end models) |
• Adjust the sensing distance to 3-5 meters. Avoid obstructions from trees or buildings. |
|
Installation Methods |
• Ground-mounted: Soft soil requires reinforcement. • Embedded: Concrete base (C25 grade). • Wall-mounted: Secure with expansion screws |
• Ground-mounted: Compact surrounding soil. • Vertical deviation of embedded components should be less than 2‰. • Wall-mounted: Inject glue after drilling to prevent loosening |
|
Maintenance Tips |
• Clean solar panels monthly. • Check wiring seals annually. • Replace lithium batteries every 3-5 years, lead-acid batteries every 2-3 years |
• Check structural stability after storms. • Choose low-temperature-resistant batteries (-30°C) for areas with severe winters |
Installation points of outdoor waterproof path lights
- Pre-installation Preparation
Inspect Accessories: Confirm that the lamp, solar panel (if applicable), bracket, screws, controller, and other accessories are complete and undamaged.
Tools: Prepare a screwdriver, wrench, electric drill (if drilling is required), level, waterproof tape, and other tools.
Site Selection:
The solar panel should be installed in an unobstructed location with at least 6-8 hours of direct sunlight daily.
Path lights should be evenly distributed along the edge of the path, driveway, or yard to avoid overlapping or blind spots.
- Lamp Installation Method
Select the installation method based on the type of lamp:
|
Installation Type |
Applicable Scenarios |
Operation Guidelines |
|
In-Ground |
Lawns, Soft Soil |
Insert the pole into the soil, compact the surrounding soil, and reinforce with concrete if necessary |
|
Embedded |
Hard Roads, Walkways |
Dig a pit (≥40cm deep) and embed a ground cage or concrete base, ensuring the vertical deviation of the pole is less than 2‰ |
|
Wall-Mounted Installation |
Walls, Fences |
Secure with expansion screws. After drilling, inject waterproof glue to prevent loosening |
|
Recessed Installation |
Steps, Floors |
Slotted installation: Ensure the fixture surface is flush with the ground to avoid tripping hazards |
- Solar System Installation
Solar panel orientation: South in the Northern Hemisphere, north in the Southern Hemisphere. Tilt angle approximately equal to the local latitude (adjustable ±10°).
Connections:
Connect in the following order: solar panel → controller → battery → lamp, paying attention to polarity.
Seal all joints with waterproof tape or heat shrink tubing to prevent oxidation and short circuits.
Controller Installation:
Secure in a well-ventilated, dry location (such as inside a light pole maintenance area), away from direct sunlight and rain.
- Mains Lighting Wiring
Pipe Requirements: Cables must be routed through PVC or galvanized steel pipes, buried at a depth of 50 cm or more to avoid mechanical damage.
Waterproofing:
Fill the junction box with waterproof putty and install a waterproof box on the outside.
Use waterproof cable connectors (e.g., IP67 rated).
Leakage Protection: Install a residual current circuit breaker in the wiring, with a grounding resistance of 4 Ω or less.
- Commissioning and Acceptance
Light Control Test: Block the solar panels (simulating nighttime) and check whether the lights automatically illuminate; remove the blockage to see if they extinguish.
Brightness Adjustment:
Use a lux meter to measure floor brightness and ensure uniformity (Emin/Eavg) > 0.4.
Adjust the angle or spacing of the lights to eliminate glare or dark areas.
Intelligent Function Test (if applicable):
Human Sensor: Measure the sensing distance (usually 3-5 meters) and response speed.
App Control: Verify that remote on/off and dimming functions function properly.
3. Maintenance Guide for Outdoor Waterproof Path Lights
Maintenance of outdoor waterproof path lights is crucial to ensuring their long-term stable operation. This requires systematic management, encompassing daily cleaning, component inspections, seasonal maintenance, and troubleshooting. Routine maintenance begins with regular cleaning of the solar panels. It's recommended to wipe the surface monthly with a soft cloth dampened in clean water, paying special attention to removing stubborn stains like bird droppings and leaves, as these impurities reduce photoelectric conversion efficiency. Cleaning the lampshade is equally important. Every two to three months, wipe it with a neutral detergent, avoiding corrosive solvents like alcohol. Also, inspect the light shield for cracks or yellowing. Structural stability checks should be a regular practice, especially after extreme weather like strong winds and heavy rain. Carefully inspect the pole, bracket, and mounting screws for looseness. For ground-mounted lamps, check for soil subsidence and tilting.
Electrical system maintenance is crucial to ensuring proper operation. For solar-powered lamps, check the charge retention of the lithium battery every six months. If the battery life is significantly reduced on rainy days, the battery may need to be replaced. For lead-acid batteries, check the electrolyte level every three months. For mains-powered lamps, pay special attention to wiring safety. Regularly check cable connectors for oxidation and buried cable insulation for damage. The controller, the brain of the system, needs to be kept dry and ventilated, away from direct sunlight. If you notice any malfunctioning lamps, try resetting the controller. Waterproofing is essential. Disassemble the lamp head annually to check for aging and deformation of the silicone seal. Ensure a tight seal when reinstalling, and replace the seal if necessary. Rust prevention of metal parts is also crucial, especially for rust-prone areas like screws and hinges. Apply a special rust-proofing oil. If paint peeling is detected, repaint promptly.
Seasonal maintenance should be tailored to the climate. In spring, focus on inspecting for potential winter damage and ensure all waterproofing measures are in place before the rainy season arrives. During high summer temperatures, pay attention to controller heat dissipation to prevent overheating and component damage. In autumn, clear fallen leaves from around the lamp to prevent accumulation that could affect heat dissipation and create safety hazards. In regions with severe winter cold, pay special attention to battery freeze protection. When temperatures drop below -20°C, it is recommended to temporarily store or replace low-temperature-resistant batteries. Basic troubleshooting techniques are essential. For example, a non-illuminating lamp may indicate a dead battery or loose wiring. Dimming brightness is often due to LED light decay or battery aging. Automatic on/off malfunction is often related to a dirty photosensor. Water ingress into the lamp indicates a potential failure of the sealing system. Establishing a long-term maintenance plan is essential. We recommend annual comprehensive inspections, LED light decay assessments every three years, and system upgrades every five years. This systematic and standardized maintenance not only extends the life of the lamp but also ensures optimal lighting performance. For complex faults, it is recommended to contact a professional technician to avoid secondary damage caused by improper operation.
Daily Cleaning and Inspection
Solar Panel Cleaning
Frequency: Wipe at least once a month (more frequently in dusty or rainy areas).
Method: Wipe with a soft cloth or sponge dampened with clean water. Avoid scratching the surface with hard objects.
Note: Stains such as bird droppings and leaves should be removed promptly to prevent charging efficiency.
Lamp Shade Cleaning
Frequency: Check every 2-3 months, and clean immediately if dust accumulation is severe.
Method: Wipe with a neutral detergent and a soft cloth; avoid alcohol or corrosive solvents.
Inspect the Mounting Structure
Check the pole, bracket, and screws for looseness, especially after strong winds or heavy rain.
For ground-mounted lamps, check the soil for subsidence and recompact or reinforce if necessary.
Battery and Circuit Maintenance
Solar Model Battery Inspection
Lithium battery: Check for charge degradation every 6 months. If battery life is significantly reduced (e.g., only 2-3 hours of light on a rainy day), consider replacing it. Lead-acid batteries: Check the electrolyte every three months (if applicable) to prevent drying out or leakage.
Mains Line Inspection
Check cable connectors for oxidation and damage, especially buried parts.
Use a megohmmeter to check insulation resistance and ensure it is >10MΩ.
Controller Maintenance
Check the controller for moisture, overheating, and blockage of vents.
If the lamp exhibits abnormalities (such as flickering or not lighting), try resetting the controller.
Waterproofing and Rust Prevention
Sealing Ring Inspection
Disassemble the lamp head annually to inspect the silicone sealing ring for deterioration or cracking, and replace if necessary.
When reinstalling, ensure the sealing ring is fully tightened to prevent rainwater from seeping in.
Rust Prevention of Metal Parts
Aluminum alloy/stainless steel lamp bodies generally do not require special treatment, but rust-prone areas such as screws and hinges can be coated with anti-rust oil.
If paint peeling is observed, repaint promptly (use outdoor anti-rust paint).
Seasonal maintenance priorities
|
Season |
Maintenance Priorities |
Precautions |
|
Spring |
Clean solar panels and check for winter damage |
Ensure waterproofing is intact before the rainy season |
|
Summer |
Prevent high temperatures and check heat dissipation |
Prevent controllers from being exposed to direct sunlight |
|
Autumn |
Clear fallen leaves and check wiring |
Prevent small animals from gnawing on wires |
|
Winter |
Prevent freezing and keep batteries warm |
In extremely cold areas (below -20°C), it is recommended to store or replace cold-resistant batteries |
Troubleshooting and resolution
|
Problem |
Possible Cause |
Solution |
|
Light not working |
Batteries dead, loose wiring, faulty light control |
Test after charging, check wiring |
|
Dimming |
LED light failure, battery aging, dust |
Clean the lampshade, replace the batteries or LED module |
|
Automatic switch malfunctioning |
Dirty photoresistor, faulty controller |
Clean the sensor, reset or replace the controller |
|
Water ingress |
Deteriorated seal, loose installation |
Replace the seal and reseal |
4. Common Problems and Solutions for Outdoor Path Lights
Outdoor path lights often encounter various problems during use, affecting their lighting effects and aesthetics. Failure or flickering may be caused by a power failure, bulb damage, driver failure, or sensor malfunction. Check the power connection, replace damaged components, or adjust the sensor. Insufficient brightness or uneven lighting is often due to aging, dust accumulation on the lampshade, or improper installation. These can be resolved by replacing the LED module, cleaning the lampshade, or adjusting the fixture layout.
Water ingress or internal condensation in the lamp is usually caused by aging rubber seals, clogged drain holes, or corrosion-resistant housing materials. Replace the rubber seals, clean the drain holes, or select a lamp with a higher protection rating. Rusted or loose light poles are often caused by peeling metal coatings or unstable foundations. Polish and repaint, reinforce the foundation, and tighten bolts promptly.
Short battery life of solar path lights may be caused by obstructed solar panels, aging batteries, or continuous rain. Keep the solar panels clean, upgrade the battery capacity, or use a hybrid solar and mains power system. Sensor failure may be due to decreased sensor sensitivity or obstruction. Adjust the sensing range or replace the sensor. Abnormal light color is often caused by inconsistent LED chip color temperature or driver instability. LEDs from the same batch should be replaced or the correct driver should be used.
Insect infestations or bird droppings can affect the performance of the lamp. Consider using an insect-resistant light source or installing a bird-repellent device. To extend the life of the lamp, it is recommended to regularly check wiring and seals, clean obstructions seasonally, and keep common spare parts on hand for quick repairs. For complex issues, it is best to contact a professional for repair.
- Lamp Not Lighting or Flickering
Possible Causes:
Power failure (e.g., short circuit, unstable voltage);
Damaged bulb or LED module;
Damaged driver/transformer;
Faulty sensor (e.g., light control, motion detection).
Solution:
Check that the power connection is secure and test the voltage for normal operation;
Replace the damaged bulb or LED light source;
Replace the driver or transformer (match the wattage);
Clean or adjust the sensor, and replace if necessary.
- Insufficient Brightness or Uneven Illumination
Possible Causes:
Lamp aging (e.g., LED luminous flux failure);
Dust accumulation or yellowing on the lampshade;
Lamp spacing too large or installation height incorrect.
Solution:
Replace LED modules with severe luminous flux failure;
Clean the lampshade regularly or replace with a material with better light transmittance;
Adjust the spacing or height of the lamps to ensure overlapping coverage.
- Water ingress or condensation inside the lamp
Possible Causes:
Aging or damaged rubber seals;
Clogged drain holes;
Uncorrosion-resistant housing material. Solution:
Replace the waterproof rubber ring and reseal the interface;
Clean the drain holes to prevent water accumulation;
Select lamps with an IP65 protection rating or higher, and stainless steel or aluminum alloy housings for greater durability.
- The light pole is rusted or loose.
Possible causes:
Peeling of the metal surface coating;
Sinking of the foundation or loose fixing bolts.
Solution:
Sand the rusted areas and reapply anti-rust paint;
Reinforce the foundation, tighten the bolts, and re-secure with concrete if necessary.
Short battery life of the solar path light.
Possible causes:
The solar panel is blocked or dirty;
The battery is aged or has insufficient capacity;
Insufficient continuous power supply on rainy days.
Solution:
Clean the solar panel surface and adjust the angle to avoid obstruction;
Replace a high-capacity lithium battery (e.g., upgrade from nickel-metal hydride to lithium);
Select a dual-mode lamp (solar + mains power).
- Sensor malfunction.
Possible causes:
Loss of sensitivity in the motion sensor module;
The light control sensor is blocked or improperly configured. Solution:
Adjust the sensing angle and sensitivity (to avoid false triggering by pets);
Ensure the light control sensor is not obstructed by leaves or other objects, or replace it with a more accurate model.
- Abnormal light color
Possible causes:
Inconsistent color temperature of the LED chips;
Unstable driver output current.
Solution:
Replace LED modules from the same batch/color temperature;
Check that the driver matches the voltage/current requirements of the lamp.
- Insect infestation or bird droppings accumulation
Possible causes:
Heat from the lamp attracts insects;
The top of the light pole becomes a bird perch.
Solution:
Choose insect-resistant LEDs (such as amber light sources);
Install bird repellent pins or regularly clean the top of the light pole.
Common problems and solutions for outdoor path lights:
|
Common Problems |
Possible Causes |
Solutions |
|
Lamp not lighting or flickering |
Power failure (short circuit, unstable voltage); damaged bulb/LED; driver failure; sensor malfunction |
Check the power supply circuit; replace the bulb or LED; replace the driver; clean or adjust the sensor |
|
Insufficient or uneven lighting |
LED light failure; dust accumulation or deterioration on the lampshade; improper spacing or height of the lamps |
Replace the deteriorating LED; clean or replace the lampshade; adjust the mounting spacing or height |
|
Water ingress or condensation on the lamp |
Deteriorated rubber seal; clogged drain hole; inadequate housing protection |
Replace the waterproof rubber seal; clean the drain hole; select a lamp with an IP65 or higher protection rating |
|
Rusted or loose lamp pole |
Peeling metal coating; foundation sinking or loose bolts |
Sand and reapply anti-rust paint; reinforce the foundation; and tighten the bolts |
|
Short battery life of the solar lamp |
Shaded/dirty solar panel; deteriorating battery; continuous rainy weather |
Clean and adjust the angle of the solar panel; replace the battery with a high-capacity one; select dual solar and AC power mode |
|
Sensor malfunction |
Faulty motion sensor module; light control sensor blocked |
Adjust sensor sensitivity or angle; remove obstructions or replace the sensor |
|
Abnormal light color |
Inconsistent LED color temperature; unstable driver current |
Replace LEDs from the same batch; check and match driver parameters |
|
Insect infestation or bird droppings accumulation |
Heat from the lamp attracts insects; the light pole becomes a bird landing spot |
Switch to insect-resistant amber LEDs; install bird repellent pins or clean them regularly |
5. Advantages and features of outdoor path lights
As a key component of modern outdoor lighting, outdoor path lights combine practicality and decorative features, offering multiple advantages in enhancing the quality of nighttime environments. Their core value lies in providing safe and reliable nighttime guidance for pedestrians and vehicles. Through scientific light distribution, they effectively eliminate dark areas on the road, significantly reducing safety hazards for nighttime pedestrians. Furthermore, with the widespread adoption of LED technology, modern path lights reduce energy consumption by over 70% compared to traditional lighting, while maintaining sufficient illumination. Combined with solar power systems, they can even achieve zero electricity bills, fully embodying the concept of energy conservation and environmental protection. In terms of intelligence, new-generation products often integrate light sensing, motion detection, and remote control. These not only enable intelligent scenarios such as "lights on when people approach and dim when people leave," but also allow for personalized settings via mobile apps, significantly improving management efficiency.
From an aesthetic perspective, today's path lights have transcended the limitations of being a single lighting tool and have become a vital element in landscape design. Designers have employed diverse shapes, ranging from simple streamlines to classical carvings and modern geometric designs, making the lights themselves a visually appealing feature. Warm lighting gently outlines the path, while adjustable color temperature and even RGB color options allow for a vibrant atmosphere tailored to the seasons and holidays, injecting artistic vitality into the nightscape. In addition to traditional column-mounted installations, a variety of mounting options are available, including recessed and wall-mounted installations, allowing for a striking design while blending seamlessly with the surrounding environment.
Durability is another key feature of outdoor path lights. Made from aircraft-grade aluminum alloy or stainless steel with a multi-layer surface treatment, these fixtures maintain optimal performance despite the harshest weather. IP65 and higher protection effectively protects against rain, dust, and salt spray, while a modular design greatly simplifies ongoing maintenance. Solar path lights are particularly noteworthy for their wiring-free design, which not only reduces installation costs but also makes them feasible for deployment in areas with limited grid coverage. With the advancement of smart city development, IoT-enabled path lights can also connect with other smart devices, leaving ample room for future expansion of smart lighting systems. These combined advantages make modern path lights an indispensable infrastructure for improving the quality of public spaces and enhancing a city's nighttime image.
- Functional Advantages
Safety Guidance: Provides clear path illumination at night or in low-light conditions, preventing pedestrians from falling or colliding.
Uniform Illumination: A well-designed layout ensures even light distribution, reduces dark areas, and improves visual comfort.
Energy Saving and Environmental Protection: LED light sources and solar-powered path lights significantly reduce energy consumption and carbon emissions.
Intelligent Control: Supports functions such as light control, motion detection, and timer switching, enabling automated management and reducing labor costs.
- Aesthetic Advantages
Diverse Designs: Modern path lights come in a variety of styles (such as modern minimalist, classical European, and Chinese) to complement various landscape styles.
Soft Lighting: Warm white or RGB colored lighting creates a warm or romantic atmosphere and enhances the landscape.
Concealed Installation: Partially buried or low-profile designs reduce visual distractions and maintain a harmonious environment.
- Durability and Maintenance Advantages
Waterproof and Dustproof: IP65 and above protection rating, suitable for use in harsh weather such as rain, snow, and dust. Corrosion-resistant materials: Made of aluminum alloy, stainless steel, or high-strength plastic, they extend service life.
Low maintenance costs: The LED light source has a long lifespan (over 50,000 hours), and solar-powered models require no wiring, reducing maintenance requirements.
- Economical Advantages
Long-term energy savings: Compared to traditional high-pressure sodium or halogen lamps, LED path lights can save over 70% on electricity costs.
Flexible installation: Solar-powered models require no complex wiring, making them suitable for remote areas or locations with inconvenient electricity access.
Policy support: Some countries and regions offer subsidies or tax incentives for energy-saving lighting products.
6. 10 Practical Tips to Extend the Life of Your Outdoor Path Lights
The key to long-lasting outdoor path lights lies in meticulous daily maintenance and proper use. Regular cleaning is essential. Wipe the lampshade with a soft cloth monthly to maintain good light transmittance. Clean the joints quarterly to prevent corrosion. Pay special attention to checking the drainage holes before and after the rainy season to ensure they are unobstructed. Ensure proper waterproofing during installation. Ensure the sealing gaskets are intact and the wiring connections are resealed with waterproof tape. For underground fixtures, ensure the base slope is well-suited for drainage. Rust prevention is essential. Inspect the light poles annually for rust and promptly polish and repaint any rust spots. 316 stainless steel is recommended for coastal areas.
Usage also affects lifespan. Avoid frequent power on and off. It is recommended to use a timer. For motion sensors, adjust the sensing distance appropriately. Lowering the brightness appropriately in winter can extend the lifespan of LEDs. Professional circuit maintenance is essential. Check the wiring connectors every six months, ensure good grounding before thunderstorms, and replace aging wiring promptly. Seasonal protection is crucial, including winter snow removal, summer heat dissipation inspections, and pole reinforcement before typhoon season.
Replace accessories promptly. LEDs should be replaced if their light fades noticeably. Solar panels should be replaced if their performance drops by more than 20%. Batteries should generally be replaced every 2-3 years. Optimize the installation layout, avoiding low-lying areas with accumulated water, ensuring the solar panels are properly oriented and unobstructed, and maintaining appropriate spacing. Optimize the intelligent system, setting the light control sensitivity appropriately, utilizing remote monitoring to detect faults promptly, and adjusting brightness via the app.
Establishing a professional maintenance plan is the most worry-free option. Establish a regular inspection system, maintain product documentation, and sign a long-term maintenance agreement with a professional company. These methods may seem simple, but with consistent application, you can ensure that your path lights are bright, long-lasting, beautiful, and worry-free, truly realizing their intended lighting value and landscape impact.
- Regular cleaning and maintenance
Wipe the lampshade surface with a soft cloth monthly to prevent dust accumulation that affects light transmittance.
Inspect the joints of the lamp quarterly and use a fine-bristled brush to remove insect carcasses and debris from the gaps.
Pay special attention to cleaning the drainage holes before and after the rainy season to prevent blockage and water accumulation.
- Proper waterproofing
Ensure the sealing rings are intact and properly installed during installation.
Use waterproof tape at the wiring connections for secondary sealing.
For underground lamps, create a drainage slope around the base.
- Scientific rust prevention measures
Inspect the lamp pole and fixings annually for rust.
Smoothly remove any rust spots with sandpaper and reapply anti-rust paint.
For coastal areas, it is recommended to use 316 stainless steel lamps.
- Appropriate usage patterns
Avoid frequent power on and off; it is recommended to use a timer.
Adjust the appropriate sensing distance and delay time for motion sensor lights. Lowering the brightness appropriately in winter can extend the life of the LED light source.
- Professional circuit maintenance
Check the wiring connectors for oxidation and loosening every six months. =
Ensure grounding is intact and effective before the thunderstorm season.
Replace aging wiring promptly to avoid short circuit risks.
- Seasonal Protection
Clear snow from lamps after winter snowfalls.
Check heat dissipation in summer.
Reinforce lamp pole fixtures before typhoon season.
Replace accessories promptly.
Replace LED light sources when they show significant light degradation.
Replace solar panels when performance drops by more than 20%.
Batteries generally need replacement every 2-3 years.
- Optimal Installation Layout
Avoid installing lamps in low-lying areas prone to water accumulation.
Ensure solar panels are facing the correct direction and are unobstructed.
Maintain appropriate spacing between lamps, avoiding overcrowding or sparse distribution.
- Intelligent System Optimization
Appropriately set the sensitivity of light control switches.
Remote monitoring systems can detect faults promptly.
Adjust brightness via the app to extend service life.
- Professional Maintenance Plan
Establish a regular inspection and maintenance system.
Retain complete product manuals and warranty cards.
Sign a long-term maintenance agreement with a professional lighting company.
